Month: February 2024

  • Food storage solutions to save space

    If you’re feeling overwhelmed by a cluttered kitchen and pantry space, you’re not alone. One of the most common issues people face in their homes is finding efficient ways to store food without sacrificing precious space. With the right food storage solutions, you can save space, keep your kitchen organized, and make meal preparation easier.

    1. Invest in Stackable Containers

    Stackable containers are a real game-changer when it comes to saving space. They allow you to utilize the vertical space in your cabinets and pantry. Look for airtight containers that come in various sizes to accommodate different food items such as pasta, rice, cereal, and baking ingredients. Clear containers are great because they let you see what’s inside without having to open them.

    2. Use Drawer Dividers for Utensils and Small Items

    Drawer organizers with adjustable dividers can help contain small food storage items such as bag clips, measuring spoons, and straws. This not only saves space but keeps you from rummaging through drawers when you’re in the middle of preparing a meal.

    3. Hanging Storage for Pans and Utensils

    A pot rack installed above your kitchen island or hanging from the ceiling can save a significant amount of cabinet space. Similarly, magnetic strips or hanging racks on the wall can hold utensils, freeing up drawer and countertop space.

    4. Over-the-Door Organizers

    Pantries and kitchen doors can be outfitted with hanging organizers designed to hold lighter items like snacks, condiment packets, and other small sundries. This strategy uses often overlooked storage areas effectively.

    5. Lazy Susans for Corner Cabinets and Fridges

    A Lazy Susan is an excellent tool for corner cabinets or even the fridge. You can store condiments, jars, and other items on these rotating trays, making everything easy to access and visually available at a glance.

    6. Under-Shelf Baskets

    If you have shelves that do not go all the way up to the next level, consider adding under-shelf baskets. These baskets slide onto the shelf and can hold a variety of items such as wraps, bags, or lightweight dry goods, helping you to utilize every inch of space.

    7. Vacuum Sealers

    For long-term food storage, save space in your freezer with vacuum sealers. This method not only compresses items like meat, fish, and even some produce for compact stacking but also helps prevent freezer burn and extends the life of your food.

    8. Expandable Shelf Organizers

    Expandable shelf organizers can help you to neatly stack dishes and can be adjusted to fit your cabinets. They are perfect for storing plates, bowls, and cups compactly and can double or even triple the amount of storage space on a single shelf.

    9. Wall-Mounted Dispensers

    Wall-mounted dry food dispensers are not just space savers but also add a touch of modernity to your kitchen. They work well for grains, cereals, and legumes, ensuring you only dispense what you need and keep the rest fresh and out of the way.

    10. Re-purpose Magazine Holders

    Plastic or metal magazine holders can be surprisingly versatile for storing canned goods, water bottles, or even as holders for chopping boards and baking trays. Place them on their sides or mount them on the inside of pantry doors for easy access.

    11. Invest in Nesting Bowls and Measuring Cups

    Nesting bowls and measuring cups that fit inside one another are ideal when storage space is at a premium. When they are not in use, they only take up the space of the largest item in the set.

    12. Clip-On Basket Systems

    Some pantry and cabinet baskets come with clip-on systems that allow you to hang them from a shelf above. They’re perfect for quickly accessible snack bags, packets of herbs, or small veggies like garlic and ginger.

    By integrating these food storage solutions into your kitchen, you’ll be able to maximize your space, reduce clutter, and enhance the overall functionality and aesthetic of one of the most important rooms in your home. Remember that organization isn’t a one-time task; it’s an ongoing process that requires occasional re-evaluation and re-organization as your needs—and your pantry contents—change.
  • Best practices for organizing kitchen cabinets

    Organizing kitchen cabinets is a task that can significantly improve the functionality and efficiency of your kitchen. Whether you’re a seasoned chef or just someone who enjoys a well-kept space, having an organized kitchen makes meal prepping easier and more enjoyable. Here’s a guide to help you get your kitchen cabinets in tip-top shape:

    1. Declutter

    The first step in organizing your kitchen cabinets is to remove everything from them. This allows you to take inventory of what you have, what you need, and what you can donate or discard. Check for expired items, duplicate tools, or anything that you haven’t used in over a year—these are prime candidates for decluttering.

    2. Group Like Items Together

    After decluttering, group your kitchen items by category. This could include:

    • Plates, bowls, and saucers
    • Glasses and cups
    • Pots, pans, and lids
    • Baking sheets and trays
    • Cooking utensils and gadgets
    • Food storage containers
    • Spices and dry goods

    Categorizing items makes it easier to find what you need and maintain order.

    3. Strategize Cabinet Use Based on Frequency

    Place items that you use daily within easy reach. Typically, this includes dishes, everyday glasses, and basic cookware. Reserve the higher and lower cabinets for less frequently used items such as special-occasion serveware, large pots, and bulky appliances.

    4. Utilize Shelf Organizers and Risers

    Using shelf organizers or risers within your cabinets can double your storage space. They are particularly useful for stacking dishes or making spices and smaller pantry items more visible and accessible.

    5. Store Containers and Lids Together

    Food storage containers can easily become a cluttered mess. Nest containers together and keep lids sorted by size or container type. Consider a lid organizer or use a kitchen drawer specifically for lids to prevent them from getting lost or causing clutter.

    6. Use Clear Containers for Dry Goods

    Transfer dry goods such as pasta, rice, and flour into clear, airtight containers. Not only does this save space and keep ingredients fresh, but it also allows you to see how much you have left at a glance.

    7. Label Everything

    Labeling shelves and containers help maintain order and makes it easy for everyone in the household to know where things go. From food storage to pots and pans, having a label can prevent confusion and save time.

    8. Keep Cleaning Supplies Handy

    Consider dedicating a cabinet close to the sink for cleaning supplies. Install a tension rod to hang spray bottles, freeing up space for sponges, dish soap, and other cleaning essentials. Remember to store any hazardous cleaning materials out of the reach of children.

    9. Install Pull-Out Drawers or Lazy Susans

    For deep cabinets, a pull-out drawer or a Lazy Susan can make it easier to reach items stored at the back. This is particularly useful for heavier objects like kitchen appliances or large bags of food.

    10. Reassess and Adapt

    Your needs might change over time, so reassess your cabinet organization every few months. Be flexible and adapt your system if certain aspects aren’t working. The more your organization reflects how you use your kitchen, the better it will serve you.

    By following these best practices for organizing your kitchen cabinets, you can create a space that’s not only aesthetically pleasing but also functional and pleasant to cook in. It’s also important to remember that maintaining an organized kitchen is an ongoing process, and it’s okay to tweak and adjust as you go along to find what works best for your household.

  • The importance of ergonomic cutlery

    Ergonomics is the study of people’s efficiency in their working environment, and this concept can be broadly applied to even the most mundane aspects of daily life, including the use of cutlery. Ergonomically designed cutlery can play a significant role in enhancing comfort and efficiency during meals, and for individuals with mobility or strength issues, it can make the difference between independence and reliance on others.

    Understanding Ergonomic Cutlery

    Ergonomic cutlery is designed with the shape and function of the human body in mind, focusing on reducing discomfort and strain. It often features:

    • Handles: Larger, non-slip, and sometimes contoured to fit the hand better. The increased diameter or adapted shape can help redistribute pressure more evenly across the hand.
    • Materials: Lightweight materials reduce the effort needed to hold and manipulate the cutlery, and textured materials provide a better grip.
    • Angles: Bent or curved utensils can reduce the need for extreme wrist movements, making them easier to use for people with limited dexterity.
    • Adaptability: Some ergonomic cutlery can be bent or adjusted to suit individual needs, allowing for a more personalized and comfortable dining experience.

    The Benefits of Ergonomic Cutlery

    Health and Comfort

    Using cutlery that does not account for ergonomics can lead to discomfort, particularly during long meals or for individuals who already have certain health issues. Ergonomic cutlery:

    • Reduces Strain: By fitting more naturally into the hand, it reduces strain on muscles and joints.
    • Improves Control: The enhanced grip and tailored design can help improve control over the cutlery, leading to a more pleasant eating experience.

    Accessibility

    People with conditions like arthritis, Parkinson’s, or other motor impairments can find it challenging to use standard cutlery. Ergonomic options offer:

    • Better Leverage: Easier for individuals with limited strength or gripping ability to use.
    • Independence: Allows those who may struggle with traditional cutlery to eat independently.

    Efficiency

    Effective ergonomic design can also increase the efficiency of motion during eating, reducing the amount of energy expended and the time taken during meals.

    Choosing Ergonomic Cutlery

    When selecting ergonomic cutlery, consider the following:

    • User Needs: Determine specific needs such as grip strength, control issues, or particular discomforts when using cutlery.
    • Material: Look for high-quality, durable materials that are also easy to clean.
    • Weight: Consider lightweight options if strength is an issue, but note that some individuals may benefit from slightly heavier cutlery to stabilize tremors.
    • Style: While function is the priority, it doesn’t have to come at the expense of form. There are stylish ergonomic options that look great on any table setting.

    Maintenance and Care

    Caring for ergonomic cutlery is often similar to regular cutlery; however, check the manufacturer’s instructions as some materials may require special care. For example, wooden handles shouldn’t be soaked and items with special grip materials may not be dishwasher safe.

    The Bottom Line

    Ergonomic cutlery goes beyond simple design changes; it embraces the understanding of human needs and applies that knowledge to create products that improve quality of life. Whether you’re living with a condition that affects your motor skills or you simply want to be proactive in maintaining a healthy lifestyle, investing in ergonomic cutlery is a step towards improved well-being at the dinner table. As a tool we use daily, it’s well worth considering the benefits of ergonomic design in your next set of forks, knives, and spoons.

  • Essential utensils for every kitchen

    A well-equipped kitchen is the cornerstone of a happy home, where delicious meals bring friends and family together. Essential utensils form the backbone of meal preparation, cooking, and baking activities. No matter if you’re a seasoned chef or just beginning to explore your culinary potential, certain utensils are indispensable in the kitchen. In this article, we’ll highlight the crucial tools that should grace every kitchen to ensure you’re well-prepared for any recipe that comes your way.

    1. Chef’s Knife: A versatile, sharp chef’s knife, typically 8-10 inches long, is fundamental for chopping, slicing, and dicing. A good knife makes prep work faster and more enjoyable.
    2. Cutting Board: Protect your countertops and ensure a stable surface for chopping with a durable cutting board. Opt for non-porous materials like bamboo or plastic that are easier to clean and less likely to harbor bacteria.
    3. Measuring Cups and Spoons: Precision in measuring ingredients is essential for consistent cooking and baking results. Both dry and liquid measuring cups, as well as a set of measuring spoons, are must-haves.
    4. Mixing Bowls: A set of mixing bowls in various sizes is useful for combining ingredients, marinating, and even serving salads. Nested bowls save space and offer versatility.
    5. Whisk: A whisk is essential for emulsifying dressings, beating eggs, and ensuring smooth batters. Choose a balloon whisk for incorporating air and a flat whisk for deglazing and sauces.
    6. Spatula: A heat-resistant silicone spatula is essential for scraping the sides of bowls, folding ingredients, and stirring foods while cooking without damaging non-stick surfaces.
    7. Wooden Spoon: Perfect for stirring soups, stews, and sauces, a wooden spoon does not conduct heat, which means you can leave it in the pot without it getting hot.
    8. Tongs: Tongs are like an extension of your hand, useful for flipping meats, tossing salads, or serving pasta. Locking tongs save space when not in use.
    9. Vegetable Peeler: A sharp peeler makes quick work of skinning carrots, potatoes, and other vegetables, as well as creating thin cheese or chocolate shavings.
    10. Can Opener: A reliable can opener is a basic tool that’s necessary for accessing a wide range of pantry staples, from tomatoes to beans.
    11. Colander: Draining pasta, washing vegetables, or sifting dry ingredients becomes effortless with a sturdy colander. Nesting colanders cater to different needs and save space.
    12. Box Grater: A multipurpose box grater allows you to grate cheese, zest citrus, slice vegetables, and more, making it a versatile tool in meal preparation.
    13. Baking Sheet and Wire Rack: For roasting vegetables, baking cookies, or cooking bacon in the oven, a baking sheet paired with a wire rack for cooling is essential.
    14. Saucepan and Skillet: A medium-sized saucepan and a 10-12 inch skillet are foundational for cooking a multitude of dishes, from rice and pasta to eggs and stir-fries.
    15. Dutch Oven: A cast iron Dutch oven is excellent for soups, stews, braising meats, and even baking bread. It’s a one-pot wonder for countless recipes.
    16. Instant-Read Thermometer: To ensure meats are cooked to the proper temperature, an instant-read thermometer is indispensable, not to mention it’s essential for candy making.
    17. Blender or Food Processor: These appliances are crucial for smoothies, pureed soups, homemade sauces, and dough preparation. They can save you time and expand your culinary capabilities.

    Remember that the quality of your utensils can significantly affect your cooking experience. Investing in well-crafted, durable tools will not only make your cooking more efficient but can also ensure safety and better end results. As you continue to cook and find your preferences, you might add more specialized tools to your collection, but the essentials listed above will provide you with a solid foundation for everyday cooking.

  • Ultimate Guide to Using and Caring for Your Pizza Stone

    If you’re a pizza aficionado looking to recreate the magic of your favorite pizzeria at home, investing in a pizza stone is a slice of genius. A pizza stone is a flat slab made from ceramic, stone, or even salt that’s designed to mimic the cooking properties of a brick oven. These stones absorb heat, redistribute it evenly, and extract moisture from the dough, which culminates in a perfectly crisp crust every time.

    In this article, we’ll go through the steps on how to use a pizza stone and share some care tips to ensure it becomes a long-standing kitchen ally.

    Choosing Your Pizza Stone Before getting started, note that there are different types of pizza stones: ceramic such as cordierite, or metal alternatives like cast iron, and even cooking steel are available. Each has its pros and cons, and selection often comes down to personal preference, though cordierite stones are known for their durability and excellent heat retention.

    Using Your Pizza Stone Here’s a step-by-step guide to help you achieve pizza perfection with your stone:

    1. Preheat the Stone Place your pizza stone in a cold oven on the middle rack. Preheat the oven to 475-500°F (245-260°C) — the hotter, the better. Let the stone heat for at least 30 minutes to an hour. This is crucial for achieving a good crust.
    2. Prepare Your Pizza While the stone is heating, prepare your pizza on a piece of parchment paper or a pizza peel dusted with cornmeal or flour. This will prevent your pizza from sticking when you transfer it to the stone.
    3. Slide Your Pizza Onto the Stone When the oven and stone are preheated, slide the pizza onto the stone using a peel. If you used parchment paper, you can transfer the pizza directly onto the stone with it. Quickly close the oven door to prevent too much heat loss.
    4. Cook Your Pizza Cook the pizza for about 10-12 minutes until the crust is golden and cheese is bubbly. Cooking times may vary depending on the oven and the thickness of your pizza.
    5. Remove the Pizza Using the pizza peel, remove the pizza by sliding it back onto the peel. Be careful, as the stone and pizza will be very hot.
    6. Let the Stone Cool After you’re done, turn off the oven, and let the pizza stone cool completely inside before removing it. This can prevent thermal shock, which could crack the stone.

    Caring for Your Pizza Stone Taking good care of your stone will prolong its life and performance.

    • Never wash your pizza stone with soap as it can absorb the suds and affect the flavor of your pizza. If you need to clean it, use a scraper to remove any leftover bits and a damp cloth to wipe it.
    • Don’t subject your stone to rapid temperature changes; it should heat up and cool down with the oven.
    • Some staining over time is normal and won’t affect the performance of your stone.
    • It’s not generally recommended to use oils or season your stone, as this could create a sticky residue that’s difficult to clean and could produce smoke when heated.

    With regular use, your pizza stone will darken, developing a non-stick patina that’s the mark of many delicious meals. Remember to always handle it with care, and it can serve up sensational pizzas for years to come.

    Whether you want to bake bread, cookies, or other baked goods, your pizza stone isn’t limited to pizzas alone. Its ability to evenly distribute heat will improve almost any baked item. It’s time to give that delivery guy a break and start crafting your homemade pizza masterpieces!

  • Best RF Signal Blockers

    What Are Signal Blocking Pouches and Cases?

    Often referred to as Faraday bags or cages, signal-blocking pouches and cases are designed to prevent your electronic devices from sending or receiving signals. This includes cellular, GPS, WiFi, Bluetooth, NFC, and RFID transmissions. They work by encasing your device in a material that effectively blocks electromagnetic fields, protecting your privacy and preventing unwanted tracking or hacking.

    Why Are They Important?

    1. Privacy Protection: In an emergency where anonymity might be crucial, preventing your phone from leaving a digital footprint can be important.
    2. Anti-Tracking: If you want to avoid being tracked by GPS, a signal-blocking pouch can ensure your location remains unknown.
    3. Device Protection: During natural disasters, electromagnetic interference can damage devices. A signal-blocking case can offer some protection against these spikes.
    4. Preventing Remote Access: In emergencies, the risk of cyberattacks could increase. Signal-blocking cases can safeguard against remote hacking attempts.
    5. Digital Silence: If you need to maintain radio silence to avoid drawing attention or to prevent misinformation from spreading during a crisis, these pouches can help.

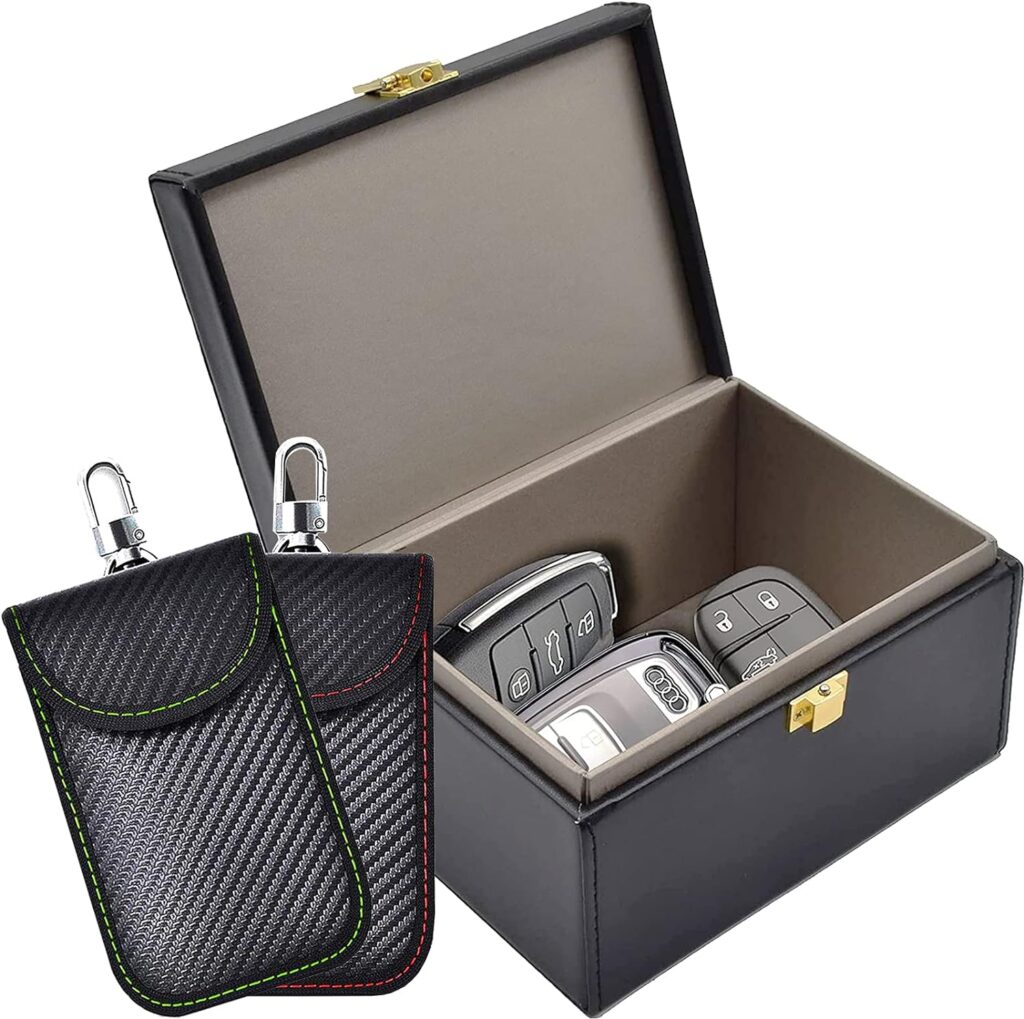
    Faraday Box for Car Keys & 2 Pack Faraday Bag

    Protect your car or other bulky items at home or while on the go, this combo comes with a small box for protecting items from RF attacks as well as two portable pouches for on the go protection.

    Mission Darkness Dry Shield Faraday Phone Sleeve

    When a cell phone is properly enclosed in the bag, no apps or malicious code can be remotely triggered or wiped, no communication can penetrate, and no one can access the microphone, camera, GPS location, or data

    Mission Darkness Dry Shield Faraday Tote 15L

    Upgrade to fully enclosed bag for any large devices like tablet or multiple phones

    Legal Considerations

    It’s important to note that while passive RF blockers are generally legal, they must be used in a way that does not violate privacy laws or interfere with authorized communications, particularly those of emergency services. It’s advisable to consult with legal experts or relevant authorities before implementing extensive RF shielding measures.

    Related Posts

    https://preppertutorials.com/signal-blocking-pouches-and-cases/